Project Settings
Add Entity
Delete Entity
Edit Entity
Auto-Start Entity
Activation Options ( Menu Item => Edit => Activation Options )
Fingerprints ( Menu Item => Edit => Fingerprints )
Use Fingerprint
Fingerprint Tolerance
License File ( Menu Item => Edit => License File )
License File Information
Local License Storage
License Accessible To All Users
User Defined Variables
In this chapter we will explain IDE features in detail.
Entity
Add Entity
SoftwareShield supports multiple entities, the new project wizard will create the first entity with specified license model, and you can add more entities by pressing New button on main UI in advanced mode:

Delete Entity
You can delete an entity by pressing "Delete" button.
Edit Entity
You can select an entity by clicking its name in the left entity list, then change its name, description, bundled license model and all available license model parameters.
Please be careful to modify the license model for a publicly released product, if you change the type of license model of an old entity, then the previous created serial numbers might not work if the actions bundled with the serial number are license model specific.
Auto-Start Entity
You can specify an entity is of an Auto Start Entity by checking on the Auto-Start on Launch checkbox. It will be accessed automatically by SoftwareShield runtime when the license is being initialized, triggering EVENT_ENTITY_TRY_ACCESS event.
-
Standard Project Type
If you have defined multiple auto-started entities, they will be accessed sequentially on application launching, as a result the customer will get confused to see the start-up UI page onStart.htm (mapped handler for EVENT_ENTITY_TRY_ACCESS event) popping up multiple times.
If yo do not define any auto-started entity, no entity will be accessed automatically by SoftwareShield runtime, so the onStart.htm will not have a chance to pop up; if you also do not enable the onLaunch event mapping (ref: \fref{sec:UIOpt}), then the application will run silently bypassing any license UI.
So it's recommended you define one and only one auto-started entity for \emph{standard} project type.
-
Custom Project Type
If you are using custom project type and want to access all entities manually in your source code via SDK api, it is better to turn off auto-start option so that the runtime behavior between the unwrapped application and wrapped application is the same, you won't be surprised to see the EVENT_ENTITY_TRY_ACCESS broadcasting even before your code tries to access the entity.
Activation Options ( Menu Item => Edit => Activation Options )
SoftwareShield supports both online activation and offline activation, the activation options GUI has two group of settings:
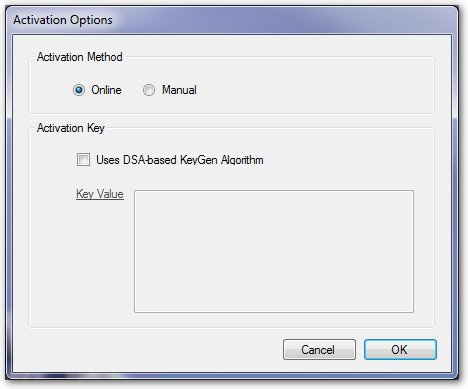
- Preferred Activation Method
What is the default activation method of your application? If your application is published, you may choose the online activation as the default one, otherwise if you only want to activate your application manually, then the offline / manual activation should be selected as the default one.
This setting is read by built-in license UI template so the preferred activation GUI can be rendered by default at runtime. The customers can switch to online / offline activation by pressing corresponding button.
- DSA Key Pair
Normally the code exchanges between client and server are plain short string code, the cracker might be able to figure out how to generate a fake license code by reverse engineering the encode algorithm. To improve the security you can enable the "Uses DSA-based KeyGen Algorithm" feature so the license code is digital signed by a private key pair, the public key is embedded inside the application exe, but the private key is stored in server side database, from the public key it is extremely hard to figure out the private key, so the cracker cannot release a functional KeyGen for your application.
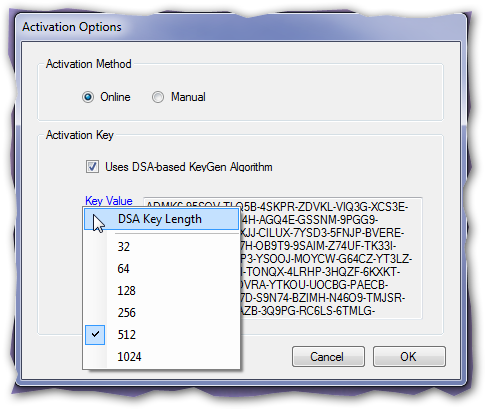
You can click the "Key Value" label to choose the desired DSA key length. A random key pair string is generated after a new key length is selected.
Once the DSA key feature is enabled, the license code returned from CheckPoint server is code signed and not good for manual activation usage due to its bloated string length. for online activation, it is not a problem at all since everything is processed by computer.
Fingerprints ( Menu Item => Edit => Fingerprints )
The Fingerprint settings of the current project can be setup in the UI:

Use Fingerprint
The "Use Fingerprint" checkbox, if checked on, will enable the Node-Lock feature of SoftwareShield for the current project. The application will check the hardware Fingerprint periodically to make sure the machine is the same as the one when this application is first installed.
If the Fingerprint / node-lock feature is not enabled, then the local machine can be upgraded without causing Fingerprint mismatch problem, however, the serial number based online activation still use local hardware information as payload of code exchange data package so that the CheckPoint server can detect the unique id of client machine and apply the correct activation limit per serial number. For offline / manual activation, the license code issued can only be used to activate the specific local machine. The only drawback compared with Fingerprint turned on is that, in some rare cases, if your customer (such as school lab administrator) can clone a master copy of the whole file system to other machines, your application will run on those cloned machines.
Fingerprint Tolerance
The maximum FingerPrint Error Tolerance, the default value is 3, in SoftwareShield there are multiple different FingerPrint items so the default tolerance is 50%.
The "Reset to Default Settings" button can be used to reset the settings to the default status.
License File ( Menu Item => Edit => License File )

The license file setting UI has two parts:
License File Information
-
File Name: The license file name generated by SoftwareShield IDE in the project release folder. For SDK integration you need to copy this file to your local development directory, for standard project type, this license file is embedded inside the output exe as a blob of data so the filename does not matter.
-
Password: The password is used to encrypt license file content. It must be kept the same between different builds otherwise the new build application cannot open existent license information from old build, thus cannot inherit the license information.
Local License Storage
These settings specify how the project's license data is persisted on the local machine.
Since SoftwareShield v5.3, there are three different storage schemes supported:

-
OLE Structured Storage This is the default scheme implemented in SoftwareShield 5 which uses Microsoft OLE technology to save data. The advantage of this scheme is that the license data is hard to be cloned to other machine, the disadvantage is that the OLE technology is rather complex and sometimes may not have enough access privilege to write to certain storage.
-
Single Database File Save license data in a single database file. This is the default scheme used by SoftwareShield Mac version, now we also add it to SoftwareShield Windows version.
You can further tell the IDE where to save the file. You can let the system decide internally, or specify an environment variable (GS_FILEDB_DIR by default) that specifies the exact file folder to save the license information.
The advantage of this scheme is that it is simple and efficient, the disadvantage is the file can be copied to other machine manually. However, if the FingerPrint / NodeLock feature is turned on, it will not cause security problem.
You can also set up the environment variable to let the license data be saved on a shared directory in a LAN, so the license can be shared by different nodes in a LAN.
- Hybrid: OLE Structured Storage + Single Database File This scheme combines two standalone storage together, if the first storage (OLE) data is corrupted or has unexpected data failure, the file database can still be used as a fall back.
License Accessible To All Users
For all the three schemes, except for the use case the file location is specified by environment variable, you can tell the SoftwareShield IDE if the license information should be shared by all users of the local machine.
By default, SoftwareShield save the license information to a public data area so that for a single software installation, it need to be activated only once, otherwise it must be activated multiple times by different users.
User Defined Variables

In SoftwareShield, you can define some variables in the license file, these variables are persisted to the local license storage and can be accessed by SDK APIs at runtime. Another important use case is that you can modify a variable by a serial number which is bundled with act_setVar action. it makes it possible to implement complex license logic by applying different kinds of serial numbers.
There are 5 supported variable types in SoftwareShield IDE:
- string A plain string.
You can, of course, store game-specific data encoded as a string in this variable. For example, a JSON data structure can be a good candidate to save complex data package. You can create a serial number associated with an act_setVar action on the CheckPoint license management web portal, copy and paste a special JSON string as the action's parameter, this JSON string will be transferred to the client side when the serial number is applied, your application can parse the JSON string and do whatever you want with it.
- integer An integer
This is a simple integer value. In this demo we create an integer variable named "MaxGameLevel", it may stands for the maximum game level the current game player (your customer) can (is authorized) to play. If he buy more levels, you can send him/her a new serial number that can set the variable MaxGameLevel to a higher value.
- float A float value
In this demo, we also create a float variable named ``GameCoins'', yes, your game may support virtual game coins and you can sell them to the game players to buy more game weapons or increase skill levels, it can be implemented by creating a serial number at CheckPoint server side and sets the coin value when applying the corresponding serial number.
- boolean
The boolean variable has two values: true and false.
In this demo project, we also create boolean variables called LevelAEnabled and LevelBEnabled, it might means the optional game module can be loaded and played when game launching. You may have decided to develop and deploy 100 sub-modules for a huge game product, to license each modules you can either
- Create 100 entities mapping to each game module;
- Create 100 boolean variables associated with each game module / level;
- Create a string variable which value is a list of enabled module index.
So you can see the SoftwareShield is rather flexible for game developers to implement a license logic in different ways.
- datetime
The input date time is a UTC value and should be in the standard format "yyyyMMddTHHmmss"; fortunately the SoftwareShield IDE gives you an intuitive date time editor for this data type.
In this demo we create a variable named "TimeExpired", you may change the value by applying a serial number, and your application can check this value and switch to DEMO mode after this date (Mar. 25, 2015, 14:25:31, UTC Time).
In SoftwareShield, these user defined variables are pre-defined ones with initial value, with SDK api you can also create new variables at runtime, the usage of these variables can help you implement very interesting and special license logic in your product.