FastSpring: In-App Integration
Create New Style
Browse to App Store Page
Auto-Activating After Payment
Summary
In the previous FastSpring tutorial we have demonstrated how to integrate SoftwareShield with FastSpring. The result sounds great, however in this section we will show you how to purchase and activate app without leaving the app, it is an amazing user experience since the customer do not have to launch a web browser to make payment and input serial number manually.
The SoftwareShield license UI is based on HTML/Javascript, which makes the in-app purchase & activate possible.
There are two major steps for the in-app integration:
- Setup the look and feel of the app store web page (hosted on FastSpring server) to share the same UI style as your license UI page.
- Activating app when the payment is successful.
The workflow is:

When app starts, the pre-app license UI pops up (onStart.htm), the user can either play the app in trial mode, or press "buy now" button to go to the app store page hosted on FastSpring server. If the license UI and app store UI looks quite similiar, the user won't know that the app store page is actually a remote web page.
On the app store page, user can continue the progress of payment, or go back to the main license startup UI anytime, or if your license is of a trial type, play the app in trial mode without payment. Anyway, if the user complete the progress of payment, a new serial number will be generated for this order, and the app will be activated automatically with the new serial number inside the app.
Let's start our step by step guide on the details.
Prepare App Store Web Page
FastSpring has documentations on how to create your own app store page style:
- Create the order page on your own: "Look and Feel: Creating Custom Store Styles";
- You can also ask for help from FastSpring ("How do I change the look and feel of my store?");
Just make sure that the app store style files are self-contained, it cannot refer to other local license UI files in UI_HTML folder because it is hosted on FastSpring's web server.
The store style file corresponding to SoftwareShield built-in templates can be downloaded here:


Of course, our style files are only for your reference, it is your responsibility to create a style that mimics your own license UI.
For example, one of SoftwareShield customers create his own app store style as following:

If you are familiar with HTML/CSS, it is not hard to prepare a unique and beautiful app store UI for your own app or company.
One of the important trick is page hopping from remote app store to local page, that is, when user click "Main" button the rendered page goes back to the UI_HTML/onStart.htm. Because the onStart.htm is not part of the app store style files, if you use the normal "window.location = onStart.htm" code, it won't work.
Instead, you must use the following code:

Please refer to UI Page Hopping for more details.
Create New Style
Go to FastSpring account home page, and click "Styles":

Click "Create Template Style":

On the pop-up dialog box, input the style name and select your style file from hard disk:

Click "Create" button, after a while the new style is created for you:

You can create multiple styles on FastSpring server, but you want only one style is applied to your selected app, to do this click "Edit Conditions" link:

Press "Next" button, select the previous created product from target product drop down list, and click "Create":

Before continue integration testing, you must activate the style:

Now you should have a working app store page tailored for your app.
Browse to App Store Page
When the buy-now url is pressed, instead of launching a default web browser to your app store, it should be rendered inside your app as following:
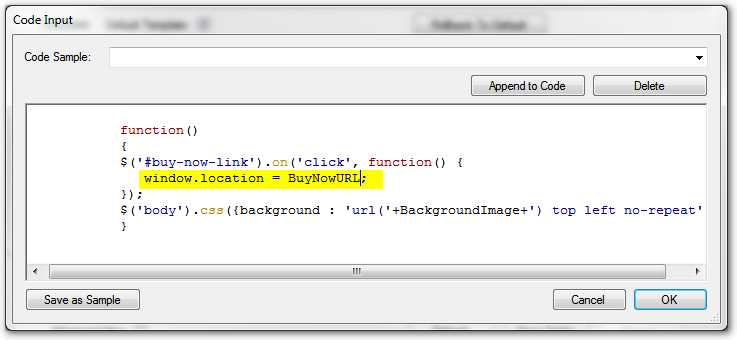
window.location = Your_AppStore_Url;
The buy-now click event handler is generated by IDE in the UI_HTML/js/GS_Mapping.js:
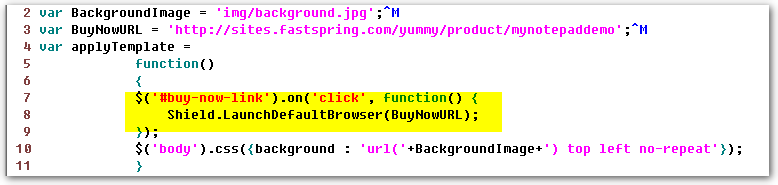
We should replace the hight-lighted part with the above javascript code. Because the GS_Mapping.js is an auto-generated file if we make the change to it directly then in SoftwareShield IDE you must remember to disable the copy javascript files option in the UI option dialog box:
main menu => Edit => UI Options:
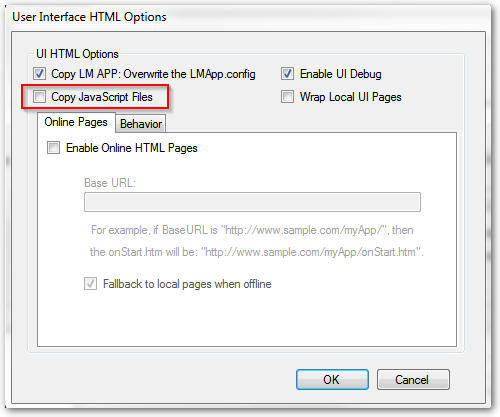
When this option is disabled, the gs5.js and GS_Mapping.js won't be updated from IDE for each build.
However, it is recommended to edit the code in IDE: ( main menu => Edit => UI Template Editor )
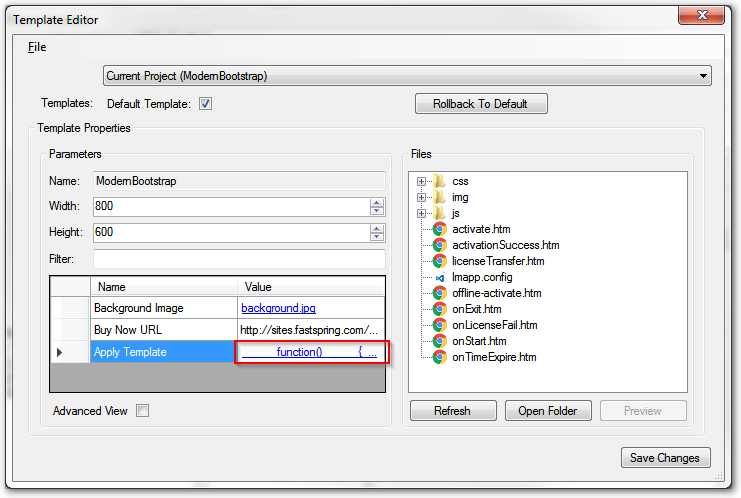
Click on the "function {..." value field, change the code as following:
Save the changes and close the UI editor, rebuild the project, you should have the correct GS_Mapping.js generated in "UI_HTML/js" folder.
Now you can test the in-app payment with built-in ModernBootstrap UI template:
You can see the in-app store page now becomes a part of your app.
Auto-Activating After Payment
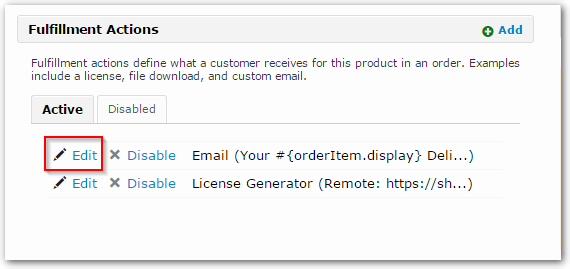
After user has made the payment successfully, FastSpring allow you setup some fullfillment Actions to define the feedback a customer receives for an order. In the previous section "Create Order Email" we have demonstrated how to send the new serial number to customer via email. To support in-app activation, we can go a step further by setting the "Web" action as following:
Go to the product home page, click the "Edit" link to modify Email fullfillment:
Click on the Web tab, Copy & Paste the content of the In-App Activation File to the Web Contents text box:
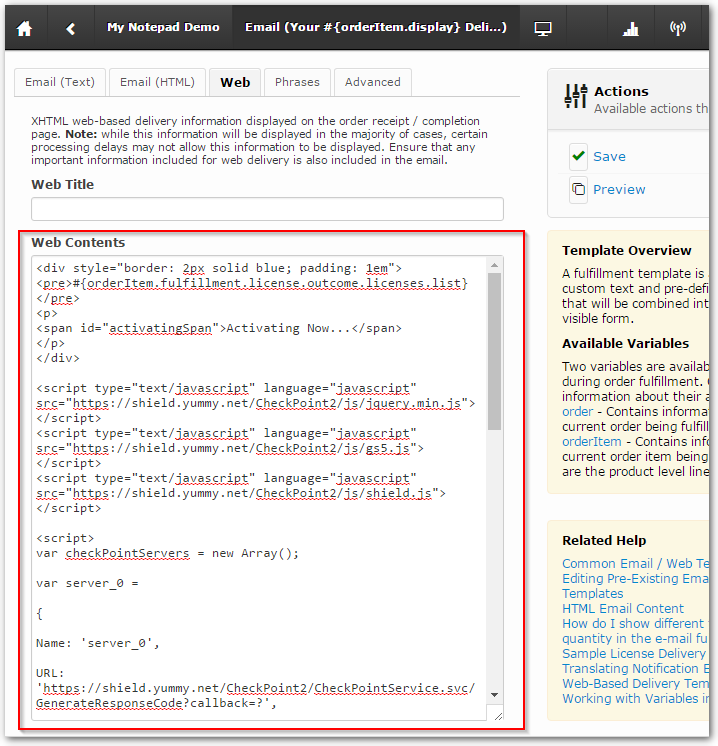
It is a HTML UI template that FastSpring will render for customer after successful payment:
<div style="border: 2px solid blue; padding: 1em">
<pre>#{orderItem.fulfillment.license.outcome.licenses.list}</pre>
<p>
<span id="activatingSpan">Activating Now...</span>
</p>
</div>

<script type="text/javascript" language="javascript" src="https://shield.yummy.net/CheckPoint2/js/jquery.min.js"></script>
<script type="text/javascript" language="javascript" src="https://shield.yummy.net/CheckPoint2/js/gs5.js"></script>
<script type="text/javascript" language="javascript" src="https://shield.yummy.net/CheckPoint2/js/shield.js"></script>

<script>

//Define CheckPoint2 Servers
var checkPointServers = new Array();

var server_0 =
{
Name: 'server_0',
URL:'https://shield.yummy.net/CheckPoint2/CheckPointService.svc/GenerateResponseCode?callback=?',
Tries: 0,
MaxTries: '3',
TimeOut: '15000',
};

var server_1 =
{
Name: 'server_1',
URL:'https://secure.yummy.net/CheckPoint2/CheckPointService.svc/GenerateResponseCode?callback=?',
Tries: 0,
MaxTries: '3',
TimeOut: '15000',
};

checkPointServers[0] = server_0;
checkPointServers[1] = server_1;

</script>

<script type="text/javascript">
   //capture the new serial number
   var serial = '#{orderItem.fulfillment.license.outcome.licenses.list}';

   $(document).ready(function () {
      Shield.Activate(serial, function(obj) {
         $('#activatingSpan').html('unable to activate: ' + obj.message);
         return false;
      },
      function()
      {
        $('#activatingSpan').html('Activated!');

        //Show the play button on success
        //Please be sure the element ID matches your UI's play button.
        //The default id in ModernBootstrap is #launch-link, in ShieldDefault is #playLink.
        $('#launch-link').show();
      });
   });
</script>
First in the HTML part we define a simple panel for message display, then in the Javascript we define two SoftwareShield CheckPoint2 license server objects, and when the HTML document is ready, we activate the app automatically.
Please make sure the "Play" button ID matches the one in local UI_HTML pages.
Summary
In this tutorial we have demonstrated how to implement in-app purchase and activation by combing the flexibility of FastSpring and SoftwareShield, the customer will get the best user experience.